Stuck with a folder full of old FLV clips you can’t play on your TV or hand to family?
You’re not alone.
Flash Video was everywhere on the web, yet most living‑room DVD players refuse to recognize it. So what’s the fastest way to convert or burn Flash Video to a clean, playable DVD—without spending a weekend troubleshooting codecs?
In this guide I’ll show two paths: a free route that gets the job done if you’re patient, and a polished path with a purpose‑built DVD creator that saves time and delivers stable results.
I’ll also share the exact tweaks I use to avoid audio‑sync drift and menu glitches. Short version: you’ll walk away with a real DVD you can pop into a standard player and watch on the couch, no drama.
What You Can Actually Do with FLV Today
Flash Video (FLV) is a legacy web format—great for small downloads, not so great for pristine TV playback. Expect variable quality; many files are low bitrate with inconsistent frame rates.
That’s fine. The goal here is practical: author a DVD‑Video that plays on set‑top players. Two realities to keep in mind:
- DVD‑Video expects MPEG‑2 video and AC‑3/PCM audio, at 720×480 (NTSC) 29.97 fps or 720×576 (PAL) 25 fps. Upscaling beyond this won’t add detail.
- Choose the right TV standard for your region (NTSC for US/Canada/Japan, PAL for Europe/most of Asia) and keep your project’s frame rate consistent to avoid judder. When is burning worth it? Archiving family clips, giving physical gifts, playing on older TVs, or making a simple menu DVD for events. For background on formats and standards, see Flash Video and DVD‑Video overviews from reliable sources.
Option 1 — Free Tools to Burn FLV to DVD
If you want free, WinX DVD Author is the most approachable choice for FLV → DVD authoring. Basic flow:
1) Install WinX DVD Author (free).
2) Click “Video DVD Author,” add your FLV files.
3) Optionally create a simple menu (title thumbnail, background image/music). 4) Set output to your DVD drive, choose NTSC or PAL, and start.
What to expect and how to avoid the usual potholes:
- Mixed frame rates across clips can cause audio drift or stutter after authoring. Quick fix: pre‑convert each FLV to a uniform frame rate (29.97 for NTSC, 25 for PAL) before authoring.
- Oversized projects (too many minutes or too high a bitrate) will either fail or auto‑lower quality. Keep total program length near 60–90 minutes per single‑layer disc for best results.
- Subtitle support is basic; if you need styled subtitles, consider a more advanced tool (see Option 2).
My mini trial‑and‑error story: I initially dropped a mix of 23.976 fps and 30 fps FLVs into a single project. Looked fine in preview, but the last 10 minutes drifted ahead of the audio. What fixed it? I batch‑normalized everything to 29.97 fps and re‑encoded audio to AC‑3 192 kbps before burning. The second disc played perfectly on a picky Sony deck.
Recommended free workflow when stability matters:
- Pre‑convert FLV → MPEG‑2 Program Stream at the target frame rate (29.97/25) and AC‑3 audio 192–256 kbps. Then author the DVD.
- Keep menus simple (static template, minimal animation) for maximum player compatibility.
- Burn at 4×–8× speed on decent media (Verbatim/TY) to reduce read errors.
Quick Troubleshooting for Free Route
- No audio after burn: re‑encode audio to AC‑3 192–256 kbps before authoring.
- Disc won’t play on TV: double‑check NTSC/PAL setting; finalize the disc; try a different brand of blank media.
- Menus don’t appear: some very old players dislike fancy motion menus—switch to a static template.
- Project too large: shorten total runtime or lower video bitrate; aim for 7–8 Mbps average for single‑layer discs.
Option 2 — Recommended: Wondershare DVD Creator
When I just want things to work—menus, chapters, subtitles, ISO folder, even Blu‑ray—the dedicated route wins.
Wondershare DVD Creator supports 150+ formats (including FLV), has an editor, 100+ menu templates, and gets from import to burn in a few clicks. It also includes utilities like Data Disc, DVD→Video Converter, ISO to DVD, and a Chapter Creator.
Step‑by‑step (Windows; Mac is similar):
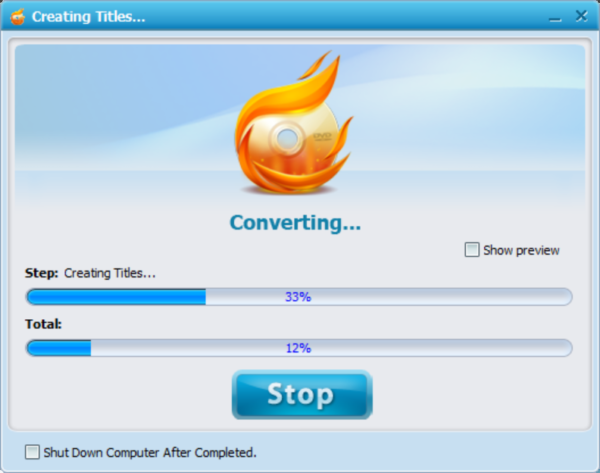
1) Launch Wondershare DVD Creator → choose “DVD Video Disc.”
2) Drag your FLV files in. Click the pencil icon to trim, crop, rotate, add subtitles, or effects. Add chapters automatically or manually.

3) Open Menu → pick a template (static/dynamic), set background image/music, edit titles. Keep it clean for older players.
4) Preview → Burn. Set Disc Label, TV Standard (NTSC/PAL), Playback Mode (menu first or play all), output to Disc/ISO/Folder. Insert a blank disc and click Burn.
Why I prefer this for mixed web clips:
- Encodes are stable even when your source files vary in frame rate/bitrate. Fewer “mystery” failures.
- Built‑in subtitle handling and one‑click chaptering save time.
- Output to ISO/Folder first if you want to test in a software player, then burn multiple copies later.
Download DVD Maker:
Pro Tips for Better Quality from Web FLV
These make a bigger difference than people think:
- Frame rate discipline: convert all sources to the project’s target (29.97 NTSC or 25 PAL) before authoring. Avoid double conversion.
- Bitrate budgeting: for a 60–90 min disc, aim ~7–8 Mbps video average, AC‑3 192–256 kbps audio. Longer runtimes? Drop video to ~5–6 Mbps to prevent re‑encode spikes and blockiness.
- Upscaling realities: don’t chase 1080p screenshots—DVD is SD. Prioritize clean deinterlace/interlace handling and sharpness.
- Audio consistency: normalize peaks to ‑1 dBFS and remove silence at clip boundaries to avoid awkward jumps.
- Test the flow: output to an ISO first, play in VLC, then burn. You’ll catch menu typos and weird transitions without wasting discs.
Quick tip: If your sources are very low bitrate FLV (think tiny early‑YouTube rips), avoid aggressive sharpening in the editor. It exaggerates mosquito noise around edges on TV. A mild denoise + tiny sharpen works better.
Also useful: If you have mixed aspect ratios, set all clips to “Letterbox” inside the authoring app so 4:3 and 16:9 parts look correct on a TV without stretching.
Compare Methods at a Glance
| Feature | Free Route (WinX DVD Author) | Wondershare DVD Creator |
|---|---|---|
| Input support | Good for common formats incl. FLV | 150+ formats, robust with odd web clips |
| Menus/templates | Basic/static | 100+ static & dynamic; easy customization |
| Stability/speed | Can stall on weird FLVs | Consistent encodes; ISO/Folder first |
| Chapters/subtitles | Limited | Built‑in editor + subtitle support |
| Outputs | Disc only in most cases | Disc, ISO, Folder, Blu‑ray, Data Disc |
| Learning curve | A bit of fiddling | Guided, polished UI |
Safety, Legal, and Disc Care
Only burn content you own or have permission to use. Many tools intentionally block copying protected material. For the physical part: use reputable media, keep discs away from heat, and burn at moderate speeds (4×–8×) to reduce write errors and improve player compatibility. If you plan several copies, generate an ISO first and verify playback before mass burning. For a deeper dive on DRM and fair use considerations, see this primer.
Conclusion
Here’s the bottom line: you can CONVERT Flash Video TO DVD with free tools if you’re willing to normalize frame rates and keep menus simple. If you’d rather BURN Flash Video TO DVD with fewer retries—and polish it with chapters, subtitles, and better templates—Wondershare DVD Creator is the no‑stress route. Either way, keep projects consistent (NTSC/PAL), budget your bitrate, and test with an ISO first. Do that, and those dusty FLV folders become neat, playable discs you can share anywhere.
FAQs
Q: Can I put more than 2 hours of FLV on a single DVD?
A: Yes, but quality drops fast. Keep it near 90 minutes per single‑layer disc or use dual‑layer media.
Q: My DVD plays on a computer but not on my old player. Why?
A: Check NTSC/PAL choice, finalize the disc, and avoid animated menus. Burn at a lower speed.
Q: Do I need to convert FLV to MP4 first?
A: Not required. Authoring apps will transcode to MPEG‑2 anyway. Pre‑converting only to unify frame rate/bitrate is helpful.
Q: Can I add subtitles?
A: Yes. Wondershare DVD Creator supports importing subtitle files; keep them short and proofread in Preview.
Q: Is it legal to burn downloaded web videos?
A: Only if you own the rights or have permission. Respect copyright and local laws.