
With smartphones now capable of taking high-quality videos, many people use their devices to capture special moments and milestones. However, if you want the whole family or a group of friends to be able to watch your recordings together on DVD – which also provides great backup options should something go wrong – here is all the info you need! Learn how easy it can be to convert those cherished phone videos to DVD that can be played in a home DVD movie player.
Why do we need to convert Phone Video to DVD
Grandma and Grandpa’s memories don’t need to be stuck in the past – DVDs provide a high-quality way of preserving their most treasured moments, although they may not have all the features that modern tech can offer these days.
How to Burn Phone Videos to DVD on Windows
Need help burning phone videos to DVD? Look no further than Wondershare DVD Creator! It’s the perfect program for Windows and Mac users who want an easy, step-by-step guide to transforming their footage.
Plus, you can customize your creation with any of its dynamic or static templates and add backgrounds, music, and images.
Moreover, it has a built-in video editor so that everyone from beginners to pros can personalize their work before hitting “burn”.
How to Burn Phone Videos to DVD stey-by-step
Step 1: Import video files
Download the install DVD maker here.

Launch the software from your desktop and get started! Tap on the “Import” button to browse imported Phone videos or image files from your computer, or make things easier by simply dragging and dropping them into the main interface.

Step 2. Editing tool (Optional)
If you need to customize images or videos before burning phone videos to DVD, click on the “Pencil” icon labeled as the edit button.

Editing your videos with ease! With video editing, you can crop, trim, add watermarks and subtitles, and adjust the effects to create an eye-catching masterpiece.
When it comes to photo editing, you have various options, such as rotating photos and adding background music and text with custom font types and colors. You can also adjust view durations per image or opt for transition effects that further enhance the overall look of your project.
Choose your favorite song as background music to create a smooth and polished show. Trim it to fit seamlessly with the rest of the production, then enhance its sound using fade-in/fade-out effects and adjusting the audio volume for optimal results.
Step 3. Design your own DVD menu
With the DVD maker, you can easily create personalized DVDs with various free menu templates.
Click on the ‘Menu’ tab and choose from themes like Holiday, Family, and Nature. To get started, select any template that catches your eye – once chosen, it will appear in a preview window to the right for the review.

Don’t be content with the default menu templates – switch to “Design Menu” for further personalization and customization!
Customize Thumbnails: To personalize your thumbnail, start by clicking the thumbnail to highlight it and then utilize its options with a simple “right-click”. Alternatively, click on the video’s frame or check the “use other image” box for choices at the bottom of your screen. The choice is yours!

You can preview your DVD creation and make any desired adjustments by pressing the ‘Preview’ button.
Add background music
Step up your DVD menu game by customizing it with your own background music! Click the ‘add audio’ icon to browse and select a song from your local library – you’ll surely make an impression with this personal touch.

Tips: Utilizing streaming music sites such as Spotify for your background music is a great way to source tunes. Check how to record Spotify music as mp3 here
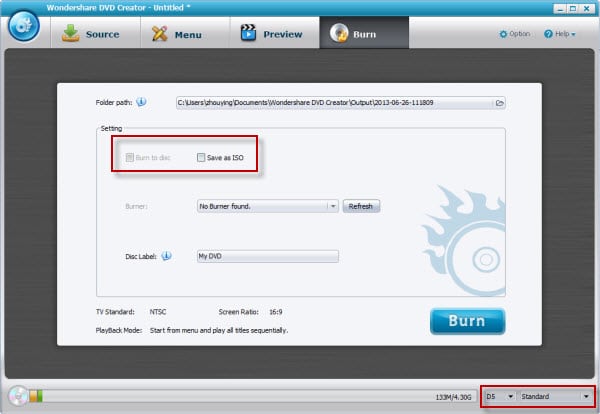
Step 4. Start making DVD
You’re almost finished! If all looks good, press “Burn” to create your video on DVD. The conversion process may take a while, depending on the size of the video you are burning.

How do I burn an ISO to a DVD?
Producing DVDs with this amazing DVD Maker is an effortless task! With only a few simple steps, you can transfer your IOS files from your computer and then click the “Burn” button. After that, let the DVD Maker’s magic do all the work for you–it’s as easy as that!
The video guide for DVD maker
How to Burn Phone Videos to DVD Free
If you’re looking for a way to turn your phone videos into DVDs, WinX DVD Author might be just the tool.
It’s free and supports many video formats, including MOV, MP4, MPEG, and more.
Plus, it lets you trim unwanted parts of the video or add subtitles – so no matter what kind of changes you want to make before burning those videos onto discs, they’ve got you covered!
You can even use their built-in YouTube downloader if any clips aren’t already stored on your PC – making this a great all-around solution for turning all sorts of vids into keepers!
How to Burn Phone Videos to DVD using WinX DVD Author:
Before you do the steps below, connect your phone to your computer. Move the videos you want to burn from your phone to your computer.
Step 1: To get started with WinX DVD Author, download, install and launch it on your computer. Then select the Video DVD Author option to continue.
Step 2: To include phone videos from your PC, click on the “+” button. You can choose several videos at once! You’ll be able to view all of them in the right pane. To edit selected clips, right-click and manage their order or add subtitles without difficulty; more features are available for each video added!
Step 3: Now, hit the Next button and take you to the DVD menu setup screen. From there, pick your background music or image of choice for your title and chapter menus!
Step 4: After specifying the desired output folder, format, and other details, such as writable drivers, all that remains is to press Start- allowing your phone videos to be burned onto a DVD.
Phone Video to DVD FAQs
Q: How do I burn an ISO to a DVD with Wondershare DVD Creator?
A: To transfer your ISO files to a disc, open the software and click “Burn”. You can then select the desired ISO file from your computer. After that, let the DVD Creator’s magic do all the work for you—it’s as easy as that!
Q: What video formats are supported by Wondershare DVD Creator?
A: Wondershare DVD Creator supports many common media formats such as MOV, MP4, MPEG-2/4 (AVI), WMV, and more.
Q: Can I add background music using Wondershare DVD Creator?
A: Yes! You can customize your DVDs with personal touches, such as custom background music. Click on the ‘Add Audio’ icon to browse and select songs from your local library – make sure it sounds good! Additionally, streaming sites like Spotify provide a great source of tunes too.
Q: Is Wondershare DVD Creator free?
A: Yes, the free version of Wondershare DVD Creator is available for download from their official site. You can also purchase a paid plan if you need more advanced features and higher-quality outputs. The paid plans come with a 30-day refund policy if unsatisfied with the product.
Q: Does Wondershare DVD Creator support 4K video resolution?
A: Wondershare DVD Creator supports up to 4K UHD video resolution for burning your videos onto a disc. It also offers other advanced editing capabilities, such as adding special effects, trimming unwanted video parts, and adding subtitles. So no matter what kind of changes you want to make before burning those videos onto discs, Wondershare DVD Creator has covered you!
Q: Can I burn multiple videos to a single DVD with Wondershare DVD Creator?
A: You can use the built-in multi-file merging feature to burn multiple videos onto a single disc using Wondershare DVD Creator. All you have to do is select the files you want to merge and then click on “Merge” in the bottom right corner of the software. After merging, you can burn your videos onto a disc.
Q: Does Wondershare DVD Creator offer any customization options?
A: Wondershare DVD Creator allows you to customize your DVDs with several menus and buttons. You can also add background music, images, and special effects to make your videos more visually appealing. Furthermore, with the built-in slideshow maker feature, you can easily create stunning slideshows with your photos and videos.
Conclusion
Wondershare DVD Creator is a great tool for burning your phone videos to DVD. You can create the perfect DVD with minimal effort, an easy-to-navigate interface, intuitive editing tools, and many customization options. Plus, it supports many popular video formats, so you don’t have to worry about compatibility issues. Try out the free version today to see what Wondershare DVD Creator offers!