Millions of people use camcorders to capture video footage every day. The most popular format for storing this footage is the MTS file extension. However, there are a limited number of devices that can play these files back. If you want to watch your videos on a DVD player, you need to convert them to a different format. In this article, we will show you how to convert MTS files to DVD or M2TS files to DVD for playback on a DVD player.
What are MTS and M2TS?
MTS (MPEG Transport Stream) is a digital video file format that is used on consumer camcorders. It contains both audio and video streams which are encoded into a single stream of data.
M2TS (MPEG-2 Transport Stream) is a variant of the MTS format and was developed specifically for Blu-ray Discs.
Can I play MTS/M2TS Files on a DVD Player?
No, you cannot play MTS/M2TS files on a DVD player. You need to convert the files to another format (e.g., MPEG-2 or H.264) that is supported by a DVD player in order for them to be playable on it.
How to Convert MTS to DVD or M2TS to DVD
First, to begin your journey in making a DVD, you’ll need software that can be easily downloaded at the link provided.
Download DVD Maker for Windows Here (Windows xp/7/8/10)
Mac user? Download MP4 to DVD for Mac here
Get the software program up and running by installing it.
Ready to burn M2TS or MTS files onto a DVD? Follow the step-by-step video guide below and learn how this powerful DVD maker can make it happen!
Check out the video tutorial for a brief overview of how to create a DVD from M2TS or MTS videos. If you need more information, browse our text guide that follows the video tutorial.
How to use DVD Maker to convert M2TS or MTS to DVD(text guide)
The software is easy to use and safe to use. Supports all modern Windows versions: 10, 8, and 7.
Step 1: Import MP4 video
Access the software from your desktop by tapping “Free Trial” if you haven’t yet bought it. The “Source” tab will be opened automatically, which allows you to upload M2TS or MTS files in one click via the “+import” button. Alternatively, drag and drop M2TS or MTS video files into the main interface to import them swiftly.
Step 2: Custom DVD menu
Create interactive DVD menus
You can organize your videos by giving them titles and displaying them on the left bar. These titles will show up as menu options when you view the DVD with a player, so make sure to name them appropriately for easy navigation.
Free menu templates
With a myriad of free DVD menu templates available, it’s easy to find one that perfectly fits your vision for the perfect menu design. Make sure you explore all the options and select your favorite template.

Thumbnail
With this feature, you can select any video frame as the perfect menu thumbnail.

Step 3: Video editing tool (Optional)
If you’d like to customize your videos before burning them onto DVD, simply click on the edit button. This step is optional yet highly beneficial as it offers basic video editing features that will help elevate the quality of your content even further.
With the video editing feature, you have all the tools you need to add watermarks and subtitles, as well as adjust a variety of effects for your videos.
With photo editing, you can take your photos to the next level with options like rotating images, adding text or background music, applying transition effects, and customizing fonts for size, color, and style. It’s even easy to set how long each shot should appear onscreen and precisely time transitions between them.
To make the show flow effortlessly, please select your favorite song for background music and edit it to match perfectly. To really bring out the sound quality of each musical piece, you can add audio fade-in/out effects and regulate its volume level.

Step 4. Start making M2TS or MTS to DVD
Ready to make your DVD disk? Before you hit “Create,” take a moment to view the project with our Preview button, just so you can be sure all settings are as they should be. Or, if needed, adjust output settings for a personalized experience that caters specifically towards your needs!
Output DVD settings
If you need to, modify the M2TS or MTS burning parameters for DVD. You’ll then be directed toward a new software window with various options that you can select from.
- Title for the disc and chapters;
- DVD menu type (text, image, or custom background);
- Volume: Standard 4.7GB, Mini 1.4GB, Double Layer 8.5GB;
- Aspect ratio: 16:9 or 4:3;
- Encoding system: PAL or NTSC;
- Audio codec: AC3 or MP2.
Depending on your geographical location, you have the choice of PAL or NTSC. Europe and Australia generally use PAL 25 fps, while in America, NTSC 29.97 is preferred.
The output format is MPEG-2. It’s the video codec (output DVD format) for all conversion options. You can’t change it. This DVD format doesn’t support high-definition resolutions like 720p, 1080p, or 4K due to its nature. It’s safer to use the defaults.
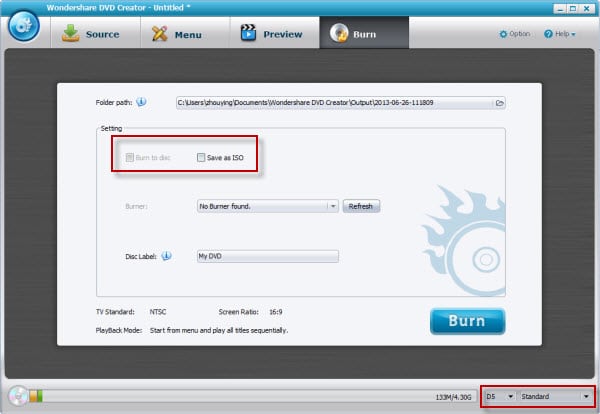
Once you have confirmed that everything is in order, simply insert a blank DVD disc into your computer’s DVD ROM (or USB-compatible DVD drive). Then, click the “Burn” button to initiate the MP4-to-DVD conversion process. Afterward, having completed this task successfully, you will be able to play these newly burned DVDs from the comfort of your own home!
It will take some time to complete the DVD conversion, depending on your graphics driver model and the video’s length. Once it is finished, you may be asked if you wish to make an additional copy – accept this offer if needed! Then, all that remains is for you to enjoy watching your new favorite movies at home with your loved ones.
Tips:
If you don’t have a blank disc at the moment, you can export your project (as a DVD file) to either a DVD folder or ISO image and save it on your computer’s hard drive or USB flash drive. When you get a blank disc, retrieving your project will be effortless. Simply add it to our cutting-edge burning software and write any data of your choice onto the new disk with ease!
In the same way, you can convert AVI video to DVD. If you want to make Blu-ray discs, check Blu-ray maker here
Conclusion
This tutorial is about how to convert MTS or M2TS to DVD. Burning MTS/M2TS videos on a blank DVD disc with this guide will become very easy for you now. You can also use the methods mentioned here to convert other formats into DVD, like AVI to DVD. What’s great about this software is that you can create an ISO image and save it for a later date. Make sure to use the highest quality blank disc and hardware possible for a better experience. Now you can stream any MTS/M2TS videos in your DVD player with ease!
Happy Converting! 🙂